 MultiScreen
1. Installation
- Téléchargez MultiScreen-Setup.exe depuis la page de téléchargement.
- Ouvrez le fichier, puis cliquez sur Install. Aucun droit administrateur n'est nécessaire.
- Si Windows affiche « Windows a protégé votre ordinateur » : cliquez sur Informations complémentaires, puis Exécuter quand même.
- L'icône MultiScreen apparaît sur le Bureau et dans le menu Démarrer.
Pour désinstaller : Paramètres Windows → Applications → MultiScreen → Désinstaller.
- Download MultiScreen-Setup.exe from the download section.
- Open the file and click Install. No administrator rights are needed.
- If Windows shows “Windows protected your PC”: click More info, then Run anyway.
- The MultiScreen icon appears on the desktop and in the Start menu.
To uninstall: Windows Settings → Apps → MultiScreen → Uninstall.
2. Premier démarrage : l'assistant2. First start: the wizard
Au premier démarrage, une petite animation s'affiche, puis un assistant vous pose quelques questions :
- Rôle de ce PC : contrôleur (le PC qui lit le film et pilote les écrans) ou écran (un PC qui affiche simplement sa partie, piloté par un autre PC du réseau).
- Disposition (contrôleur) : nombre d'écrans, colonnes et résolution de chaque écran — ou, pour un PC écran, l'adresse IP du contrôleur.
- Licence : votre Machine ID est affiché. Vous pouvez activer une clé maintenant ou plus tard (la démo marche sans clé).
- Démarrage automatique : MultiScreen peut démarrer avec Windows, directement en plein écran.
Cliquez sur Finish : MultiScreen s'ouvre en plein écran. Une icône apparaît aussi près de l'horloge Windows : clic droit pour Ouvrir, ouvrir/fermer les écrans en plein écran, voir l'adresse réseau, relancer l'assistant ou quitter.
On the first start, a short animation plays, then a wizard asks a few questions:
- Role of this PC: controller (the PC that plays the film and drives the screens) or screen (a PC that just shows its part, driven by another PC on the network).
- Layout (controller): number of screens, columns and resolution of each screen — or, for a screen PC, the controller's IP address.
- License: your Machine ID is shown. Activate a key now or later (the demo works without a key).
- Start with Windows: MultiScreen can start with Windows, straight to fullscreen.
Click Finish: MultiScreen opens fullscreen. An icon also appears next to the Windows clock: right-click it to Open, open/close the screens fullscreen, see the network address, run the setup wizard again or quit.
3. La fenêtre principale3. The main window
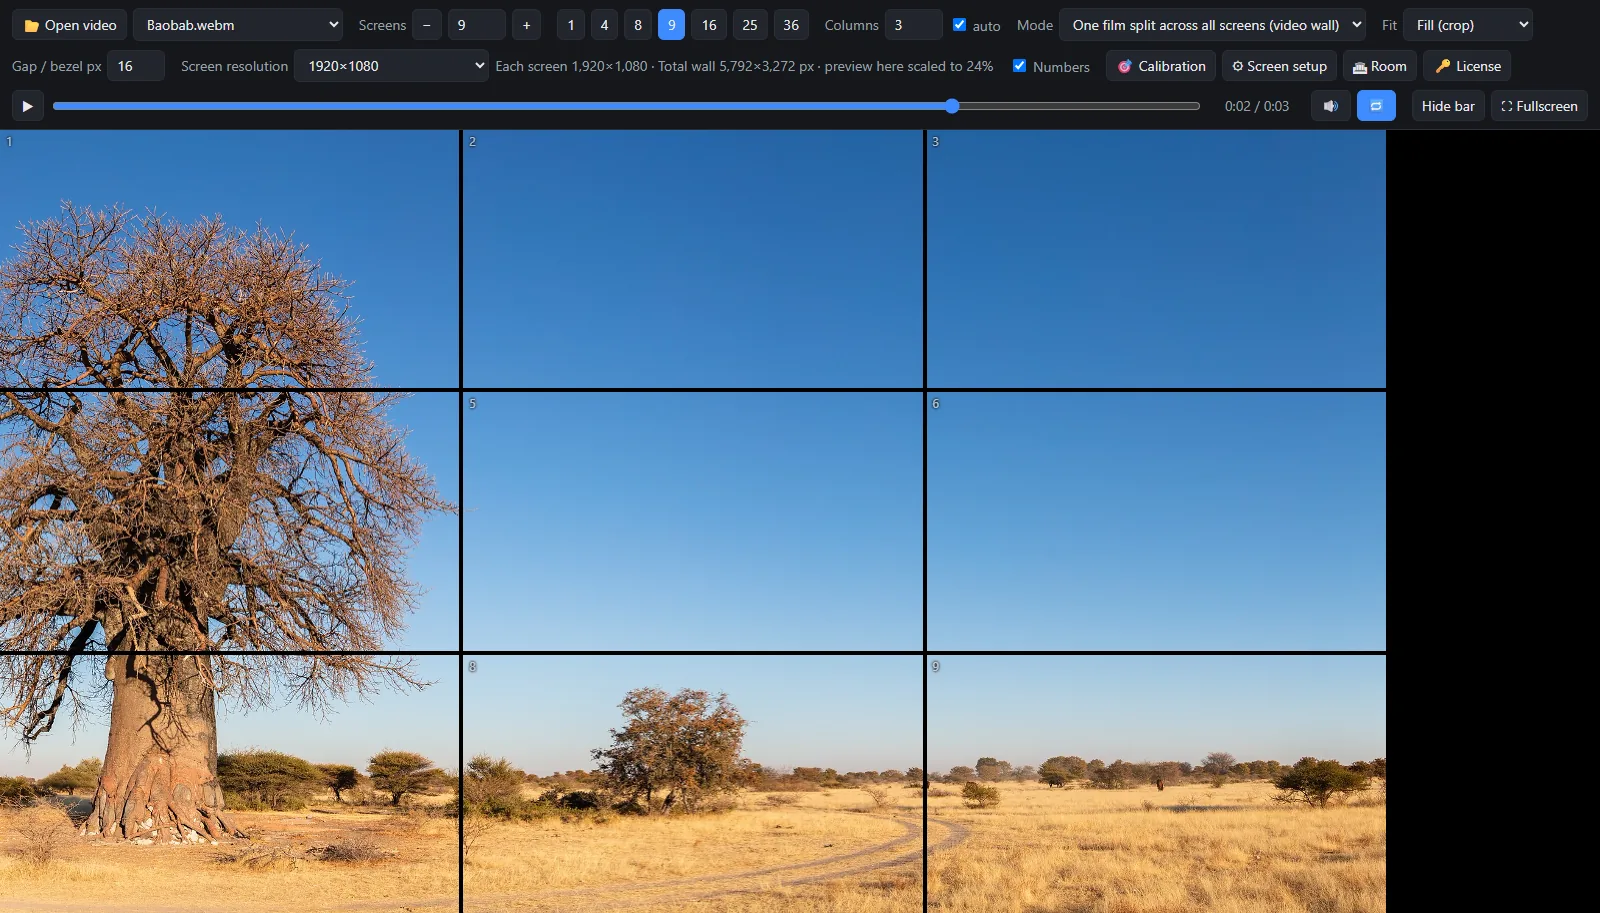
- 📂 Open video : choisir un film sur ce PC. 🎬 Films on the server : les films déjà copiés pour les écrans réseau.
- Screens : nombre d'écrans (boutons 1, 4, 8, 9, 16, 25, 36 ou − / +). Columns : nombre de colonnes (auto les calcule).
- Mode : Same film on every screen (miroir) ou One film split across all screens (mur vidéo).
- Fit : Fit (bandes noires), Fill (recadré) ou Stretch (étiré).
- Gap / bezel px : largeur des cadres entre écrans, en pixels réels.
- Screen resolution : la résolution exacte de chaque écran (1680×1050, 1920×1080, 4K, portrait…).
- 🎯 Calibration, ⚙ Screen setup, 🏛 Room, 🔑 License : voir les sections suivantes.
- ▶ lecture/pause, barre de temps, 🔁 boucle, 🔊 son, Hide bar (cacher la barre), ⛶ Fullscreen.
- 📂 Open video: pick a film on this PC. 🎬 Films on the server: films already copied for network screens.
- Screens: number of screens (buttons 1, 4, 8, 9, 16, 25, 36 or − / +). Columns: number of columns (auto works them out).
- Mode: Same film on every screen (mirror) or One film split across all screens (video wall).
- Fit: Fit (black bars), Fill (crop) or Stretch.
- Gap / bezel px: width of the frames between screens, in real pixels.
- Screen resolution: the exact resolution of each screen (1680×1050, 1920×1080, 4K, portrait…).
- 🎯 Calibration, ⚙ Screen setup, 🏛 Room, 🔑 License: see the next sections.
- ▶ play/pause, time bar, 🔁 loop, 🔊 sound, Hide bar, ⛶ Fullscreen.
4. Mur vidéo et miroir4. Video wall and mirror
- Ouvrez votre film (📂 Open video).
- Réglez le nombre d'écrans et de colonnes, par exemple 9 écrans en 3 colonnes.
- Mode → One film split across all screens pour un mur, ou Same film on every screen pour un miroir.
- Indiquez la résolution de vos écrans, et la largeur des cadres dans Gap / bezel px pour que l'image passe « derrière » les cadres.
- Envoyez l'image vers les vrais écrans : moniteurs HDMI ou écrans réseau.
- Open your film (📂 Open video).
- Set the number of screens and columns, for example 9 screens in 3 columns.
- Mode → One film split across all screens for a wall, or Same film on every screen for a mirror.
- Enter your screens' resolution, and the frame width in Gap / bezel px so the picture passes “behind” the frames.
- Send the picture to the real screens: HDMI monitors or network screens.
▶ Essayer dans la démo en ligneTry it in the live demo
5. Moniteurs branchés sur ce PC (HDMI / DisplayPort)5. Monitors connected to this PC (HDMI / DisplayPort)
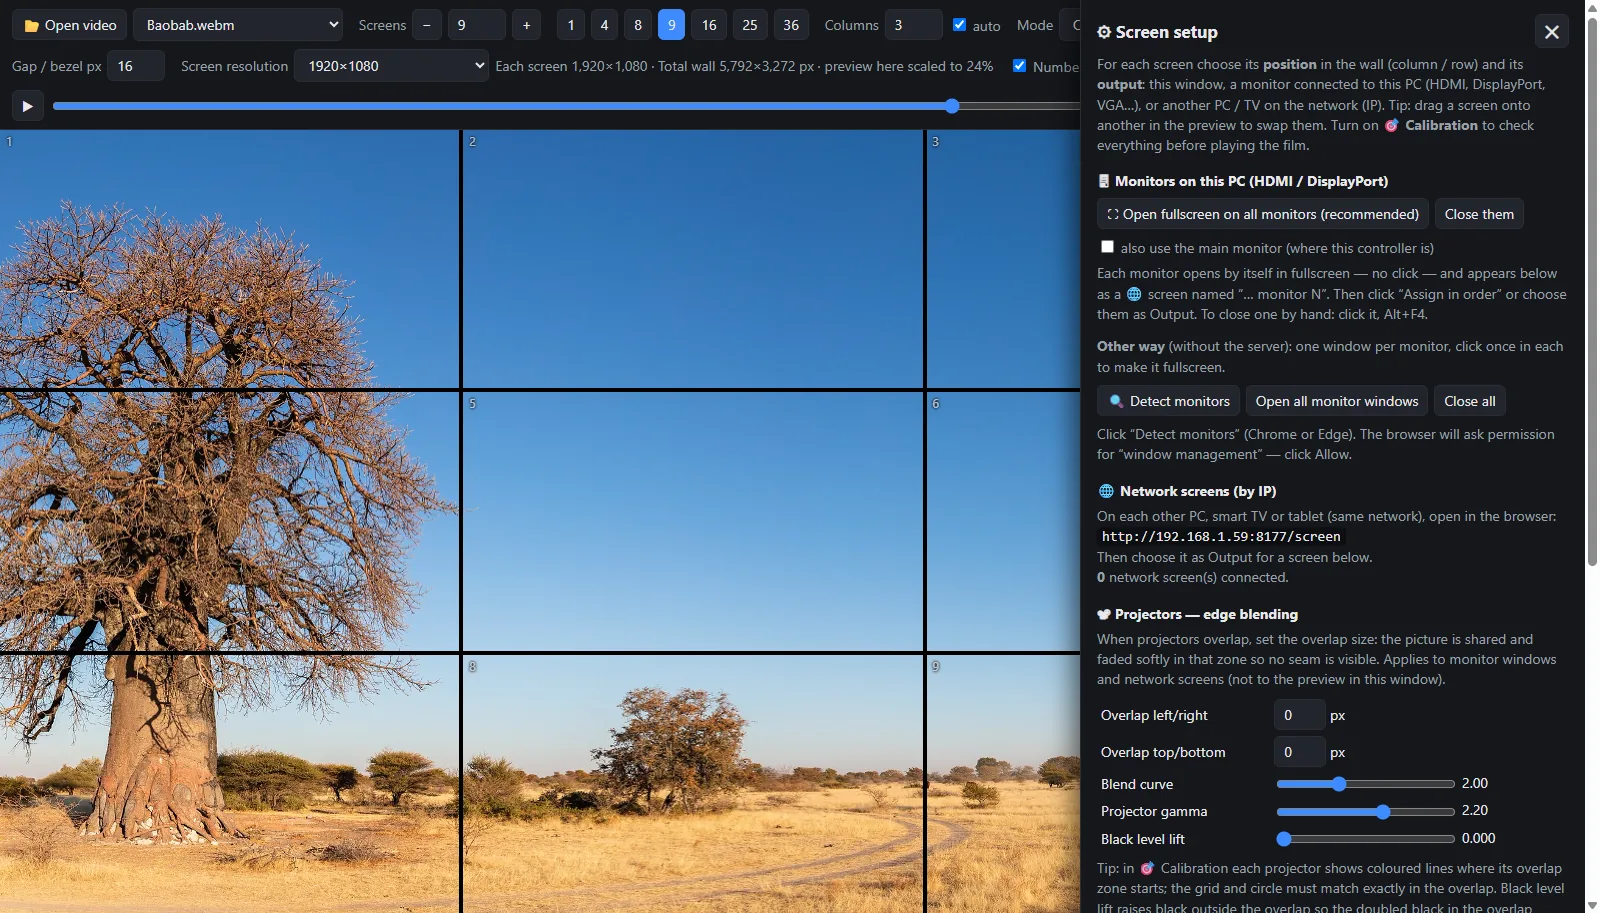
- Ouvrez ⚙ Screen setup (touche S).
- Cliquez sur ⛶ Open fullscreen on all monitors (recommended). Chaque moniteur s'ouvre tout seul en plein écran.
- Cochez also use the main monitor si l'écran principal fait aussi partie du mur.
- Cliquez sur 🌐 Assign network screens in order, ou choisissez la sortie de chaque écran dans le tableau.
Autre méthode : 🔍 Detect monitors puis Open all monitor windows (Chrome ou Edge demande l'autorisation « gestion des fenêtres » — cliquez sur Autoriser). Close all ferme ces fenêtres.
- Open ⚙ Screen setup (key S).
- Click ⛶ Open fullscreen on all monitors (recommended). Each monitor opens fullscreen by itself.
- Tick also use the main monitor if the main screen is also part of the wall.
- Click 🌐 Assign network screens in order, or pick each screen's output in the table.
Other way: 🔍 Detect monitors then Open all monitor windows (Chrome or Edge asks for the “window management” permission — click Allow). Close all closes these windows.
6. Écrans réseau (autres PC, smart TV, tablettes)6. Network screens (other PCs, smart TVs, tablets)
- Les appareils doivent être sur le même réseau (Wi-Fi ou câble) que le PC contrôleur.
- Sur chaque appareil, ouvrez le navigateur à l'adresse indiquée dans ⚙ Screen setup → Network screens, par exemple
http://192.168.1.20:8080/screen.
Sur un PC Windows, vous pouvez aussi installer MultiScreen et choisir le rôle écran dans l'assistant. - Sur le contrôleur, cliquez sur 📤 Share with network screens pour copier le film vers les écrans réseau.
- Cliquez sur 🌐 Assign network screens in order (ou choisissez la sortie de chaque écran). Les écrans réseau restent synchronisés pendant la lecture.
- Devices must be on the same network (Wi-Fi or cable) as the controller PC.
- On each device, open the browser at the address shown in ⚙ Screen setup → Network screens, for example
http://192.168.1.20:8080/screen.
On a Windows PC you can also install MultiScreen and choose the screen role in the wizard. - On the controller, click 📤 Share with network screens to copy the film to the network screens.
- Click 🌐 Assign network screens in order (or pick each screen's output). Network screens stay in sync while playing.
7. Calibration
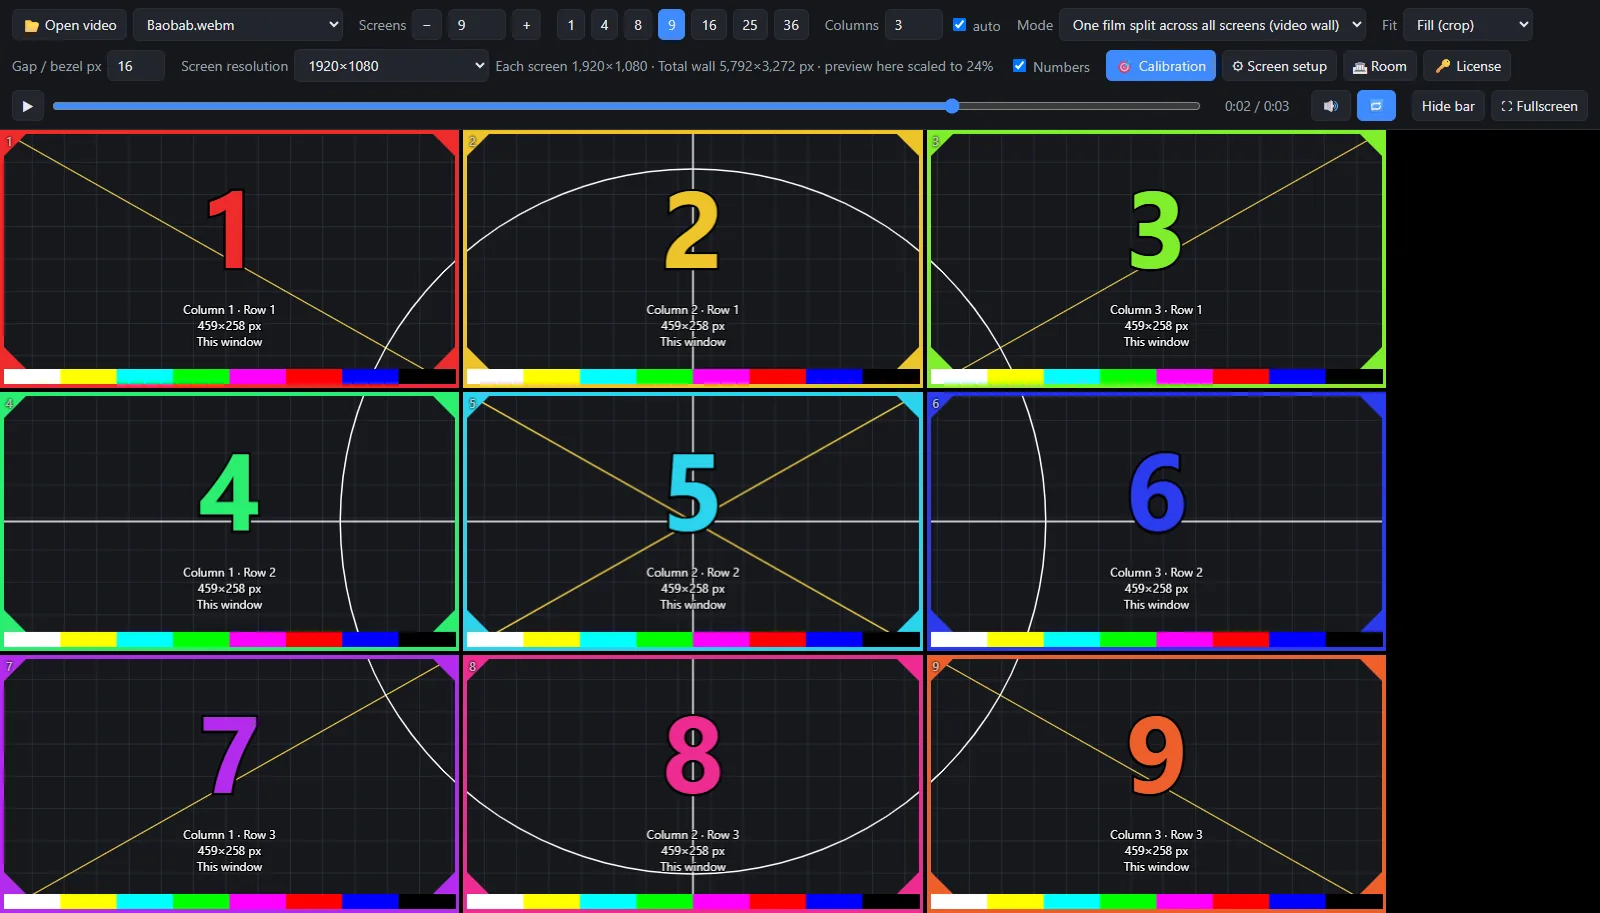
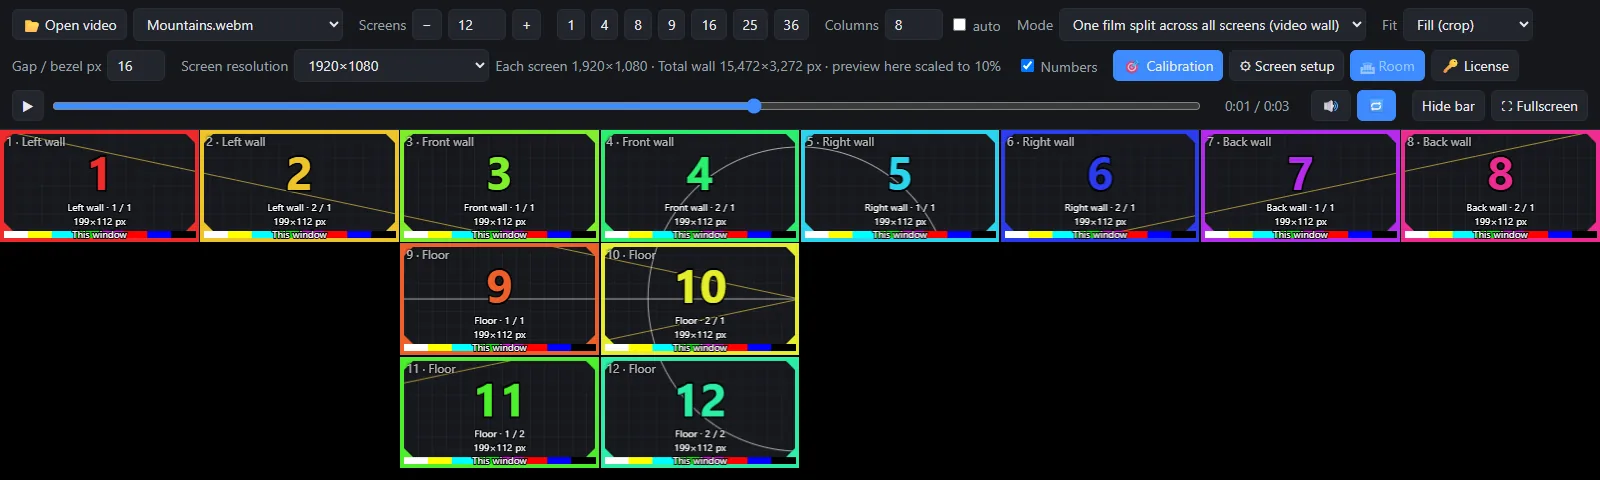
Cliquez sur 🎯 Calibration (touche C). Chaque écran affiche son numéro, sa couleur, sa colonne et sa ligne, sa résolution, une grille, des diagonales, un cercle et des barres de couleur.
- Les numéros doivent se suivre dans le bon ordre. Sinon, échangez les écrans dans ⚙ Screen setup.
- Les diagonales et le cercle doivent continuer sans cassure d'un écran à l'autre.
- Les barres de couleur permettent de comparer les couleurs des écrans.
Cliquez à nouveau sur Calibration pour revenir au film.
Click 🎯 Calibration (key C). Each screen shows its number, colour, column and row, resolution, a grid, diagonals, a circle and colour bars.
- The numbers must follow in the right order. If not, swap screens in ⚙ Screen setup.
- The diagonals and the circle must continue without a break from one screen to the next.
- The colour bars let you compare the screens' colours.
Click Calibration again to go back to the film.
8. Salle immersive (murs et sol)8. Immersive room (walls and floor)
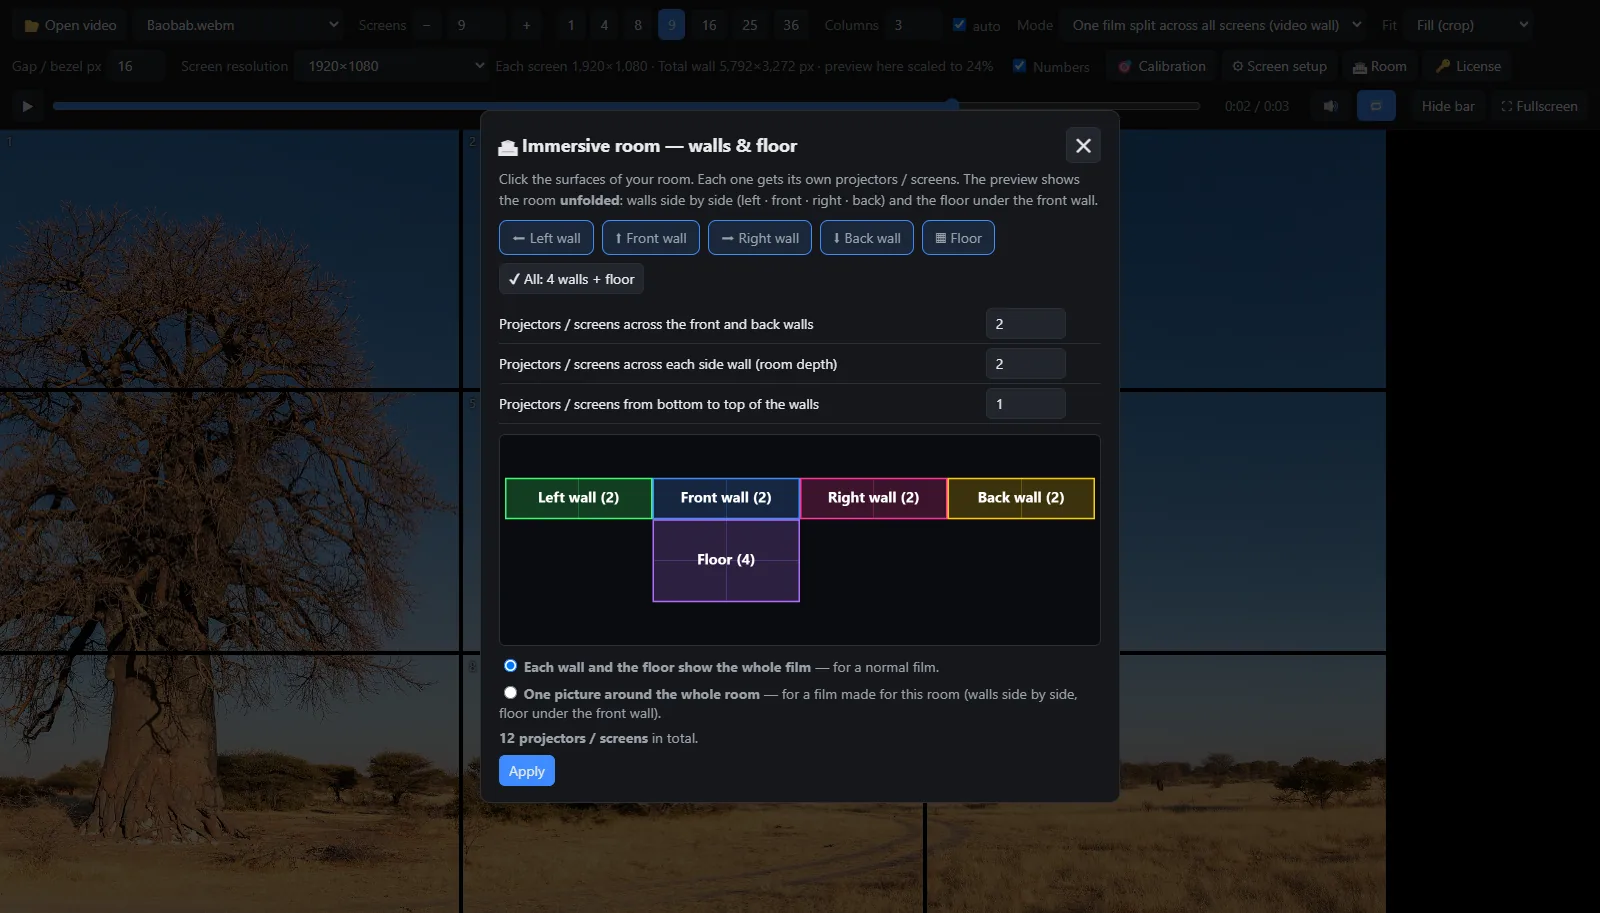
- Cliquez sur 🏛 Room.
- Cliquez les surfaces de votre salle : Left wall, Front wall, Right wall, Back wall, Floor — ou ✔ All: 4 walls + floor.
- Indiquez le nombre de projecteurs/écrans : en largeur sur les murs avant et arrière, en profondeur sur les murs latéraux, et de bas en haut.
- Choisissez l'image :
- Each wall and the floor show the whole film — pour un film normal ;
- One picture around the whole room — pour un film fait pour la salle (murs côte à côte, sol sous le mur avant).
- Cliquez sur Apply. La prévisualisation montre la salle « dépliée ». Back to one flat wall revient à un mur simple.
- Click 🏛 Room.
- Click the surfaces of your room: Left wall, Front wall, Right wall, Back wall, Floor — or ✔ All: 4 walls + floor.
- Enter the number of projectors/screens: across the front and back walls, along the side walls (room depth), and from bottom to top.
- Choose the picture:
- Each wall and the floor show the whole film — for a normal film;
- One picture around the whole room — for a film made for the room (walls side by side, floor under the front wall).
- Click Apply. The preview shows the room “unfolded”. Back to one flat wall returns to a simple wall.
▶ Voir la salle en 3D dans la démoSee the room in 3D in the demo
9. Projecteurs : fondu, forme et couleur9. Projectors: blending, shape and colour
Fondu entre projecteurs (edge blending)
Quand deux projecteurs se recouvrent, la zone commune est deux fois plus lumineuse. Dans ⚙ Screen setup → Projectors — edge blending :
- Overlap left/right et Overlap top/bottom : largeur de la zone commune, en pixels.
- Blend curve et Projector gamma : forme du fondu — ajustez jusqu'à ce que la jonction disparaisse.
- Black level lift : éclaircit le noir hors de la zone commune pour que les noirs soient égaux.
Forme (warp) et couleur de chaque sortie
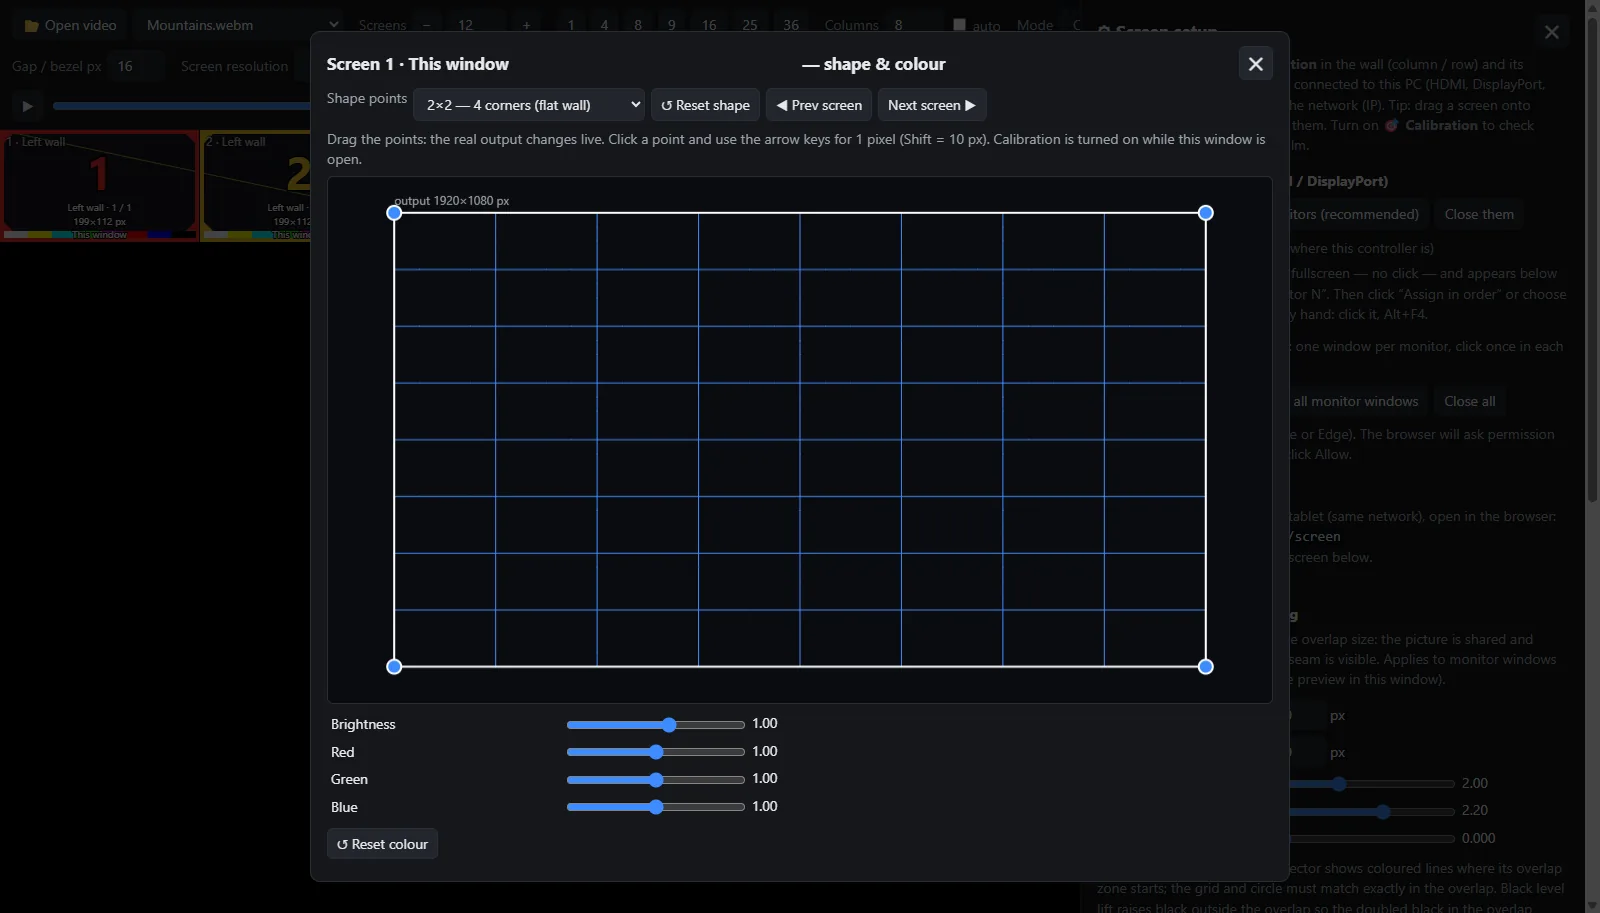
Dans le tableau de ⚙ Screen setup, cliquez sur 🎛 à côté d'un écran :
- Shape points : 2×2 (4 coins, mur plat) jusqu'à 5×5 (maillage pour surfaces courbes ou irrégulières). Faites glisser les points ; flèches du clavier = 1 pixel, Shift = 10 pixels.
- Brightness, Red, Green, Blue : pour que tous les projecteurs aient la même couleur.
- ◀ Prev screen / Next screen ▶ pour passer d'une sortie à l'autre, ↺ Reset pour revenir à zéro.
Edge blending
Where two projectors overlap, that zone is twice as bright. In ⚙ Screen setup → Projectors — edge blending:
- Overlap left/right and Overlap top/bottom: width of the overlap, in pixels.
- Blend curve and Projector gamma: shape of the blend — adjust until the seam disappears.
- Black level lift: raises black outside the overlap so blacks match.
Shape (warp) and colour of each output
In the ⚙ Screen setup table, click 🎛 next to a screen:
- Shape points: 2×2 (4 corners, flat wall) up to 5×5 (mesh for curved or uneven surfaces). Drag the points; arrow keys = 1 pixel, Shift = 10 pixels.
- Brightness, Red, Green, Blue: so all projectors have the same colour.
- ◀ Prev screen / Next screen ▶ to move between outputs, ↺ Reset to start again.
▶ Voir le fondu dans la démoSee blending in the demo
10. Licence10. License
Sans licence, MultiScreen fonctionne en démo : 4 écrans maximum, avec « DEMO » sur l'image.
- Cliquez sur 🔑 License et copiez votre Machine ID (par ex.
BE6D-B6E4-…). - Envoyez-le-nous avec l'édition souhaitée (formulaire de contact ou email).
- Collez la clé reçue (
MS-…) et cliquez sur Activate.
La licence est vérifiée en ligne à l'activation, puis de temps en temps. Sans Internet, MultiScreen continue de fonctionner. Pour changer de PC, contactez-nous : nous libérons la licence de l'ancien PC.
Without a license MultiScreen runs as a demo: up to 4 screens, with “DEMO” on the picture.
- Click 🔑 License and copy your Machine ID (e.g.
BE6D-B6E4-…). - Send it to us with the edition you want (contact form or email).
- Paste the key you receive (
MS-…) and click Activate.
The license is checked online when you activate it, then from time to time. Without Internet MultiScreen keeps working. To move to another PC, contact us: we free the license from the old PC.
11. Raccourcis clavier11. Keyboard shortcuts
| Space | Lecture / pausePlay / pause |
| F | Plein écranFullscreen |
| H | Cacher la barre (approchez la souris du haut pour la revoir)Hide the bar (move the mouse to the top to see it) |
| C | Calibration |
| S | Screen setup |
| M | Couper le sonMute |
| + / − | Ajouter / retirer un écranAdd / remove a screen |
12. Dépannage12. Troubleshooting
Windows bloque l'installation (SmartScreen)
Cliquez sur Informations complémentaires puis Exécuter quand même.
Le premier démarrage est lent
C'est l'analyse antivirus de Windows au premier lancement (30–60 s). Ensuite c'est rapide.
« MultiScreen is already running »
MultiScreen est déjà ouvert : utilisez l'icône près de l'horloge Windows → Open. Pour le fermer complètement : clic droit → Quit.
Un écran réseau n'apparaît pas
Même réseau ? Bonne adresse (voir Screen setup → Network screens) ? Pare-feu Windows du contrôleur : autorisez MultiScreen (port 8080). Rechargez la page sur l'appareil.
Le film ne se lit pas
Utilisez un MP4 (H.264) ou un WebM. Pour les écrans réseau, cliquez d'abord sur 📤 Share with network screens.
Les écrans sont dans le désordre
Activez 🎯 Calibration, puis dans ⚙ Screen setup faites glisser un écran sur un autre pour les échanger, ou changez sa sortie.
Besoin d'aide ? Contactez-nous.
Windows blocks the installation (SmartScreen)
Click More info then Run anyway.
The first start is slow
That is Windows' antivirus scan on the first launch (30–60 s). After that it is fast.
“MultiScreen is already running”
MultiScreen is already open: use the icon next to the Windows clock → Open. To close it completely: right-click → Quit.
A network screen does not appear
Same network? Right address (see Screen setup → Network screens)? Controller's Windows firewall: allow MultiScreen (port 8080). Reload the page on the device.
The film does not play
Use an MP4 (H.264) or WebM file. For network screens, first click 📤 Share with network screens.
The screens are in the wrong order
Turn on 🎯 Calibration, then in ⚙ Screen setup drag a screen onto another to swap them, or change its output.
Need help? Contact us.
Crédits photosPhoto credits
Photos de la démo et des captures d'écran : Wikimedia Commons, licence CC BY-SA.Photos in the demo and screenshots: Wikimedia Commons, CC BY-SA license.
Michal Klajban — Ahuriri River before sunrise (CC BY-SA 4.0) ·
Diego Delso — Cataratas Victoria,
Cordillera de Alaska,
Baobab, Makgadikgadi Pans (CC BY-SA 4.0) ·
Pudelek — Durmitor mountains (CC BY-SA 4.0) ·
Chensiyuan — Cuiping, Yangshuo (CC BY-SA 4.0).
Images redimensionnées et recadrées.Images resized and cropped.


